StarVedia

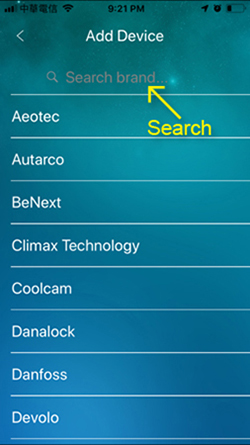
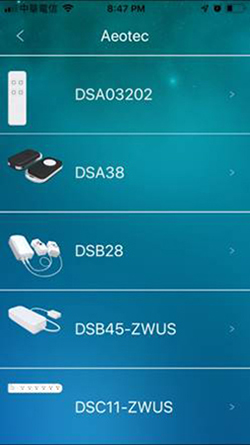
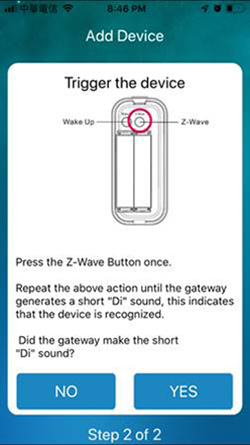
The basic function of the gateway is to allow the gateway to include any Z-Wave devices in the market into the gateway. Usually, the biggest trouble for the inclusion is that each device has different way of initiating the inclusion process, some devices need to press a button three times, another device needs to press one time for 3 seconds, other devices may need to open a cover to find a button to press. The gateway solves this trouble by giving this inclusion a step-by-step instructions for most of the Z-Wave devices in the market. You can even search on the App for the instructions of the specific device model to speed up the whole inclusion process.
The step-by-step exclusion instructions of the Z-Wave devices are also provided.
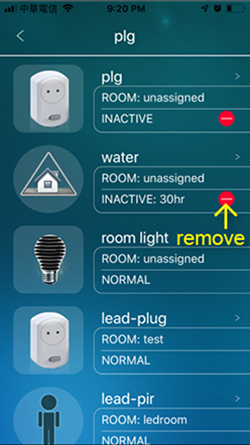
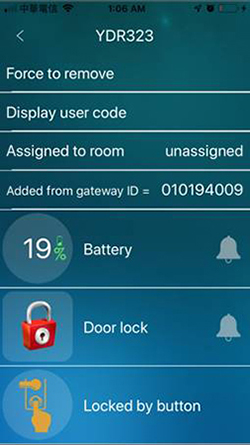
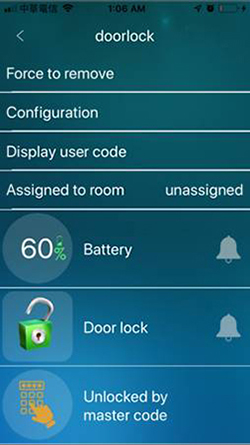
After the device is included, the controlling of the device is simple, just click the device icon to power on/off the plug, switch, door lock, bulb or curtain. The values of different sensors like temperature, humidity and brightness are clearly displayed, even the battery capacity is shown. If any Z-Wave device is inactive, the status will be shown. This inactive device could be removed by a click. A “force to remove” function is also provided to manually remove this device immediately. If a device is removed from the gateway by “force to remove”, the device does not know it was removed. So, for the “force to removed” device, it needs to do the exclusion procedure before able to do the inclusion of the device to the gateway again next time.
There are two kinds of Z-Wave devices, those with battery and those powered by electricity. The battery powered devices, most of the time they are on sleep mode, only will wake up when sensor is triggered or wake up time is up. During the sleep mode, they will not receive any command from the gateway, unless you press the wake up button on the device. The gateway will display the battery device as inactive if there are no message from the device for more than 24 hours. For the electricity powered device, if the gateway send a command to the device and it does not respond anything in three minutes, the gateway will display it as inactive.
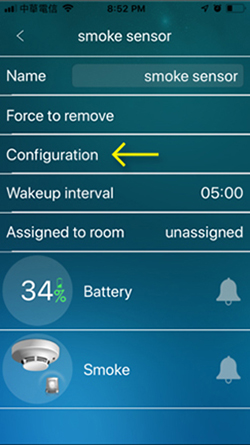
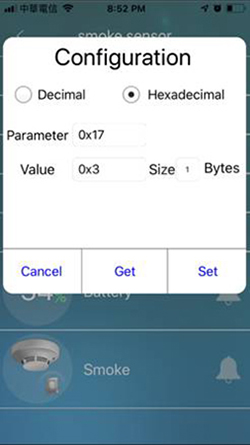
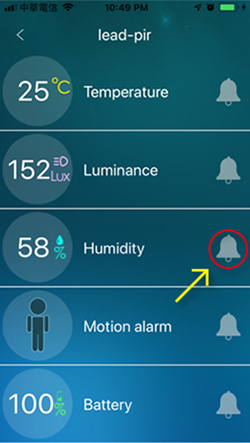
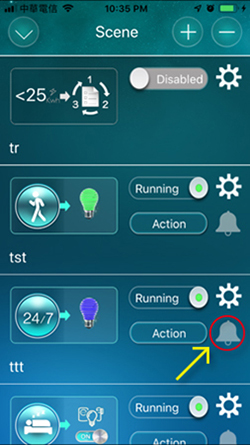
And it’s also easy to enable the alarm notification of each device when the device is triggered by powered on, by motion detected, by window opened, by smoke detected or by light turned on, just click the bell icon on each device settings page and it’s done.For the battery device, when there is no triggering, the device is in sleep mode to save the battery consumption. There is a wake up interval for the device, which is the interval between wakeup times for the device to update its status to the gateway. Smaller wake up interval means more often status update, but more battery consumption. The default wake up interval is 6 hours.Some of the Z-Wave devices could be configured with different parameters for its proprietary settings, for example, to set the sensitivity of the motion detection or set the temperature unit C/F. The gateway provide this configuration function. Please refer to the data sheet of each device for their proprietary parameters. The maximum number of allowed Z-Wave devices included in a single gateway is 120 devices.
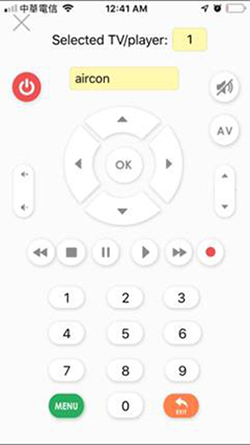
There are two types of Z-Wave devices that worked as IR controllers, one is to control the air conditioner and the other is to control the AV machines (TV and player). They are detailed as below:
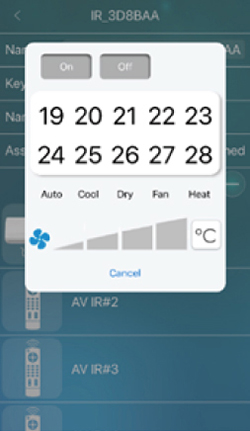
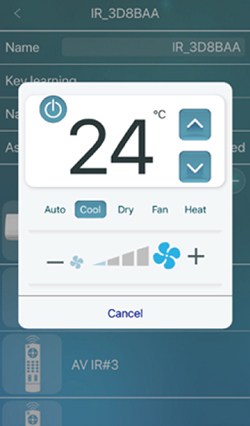
a. IR for controlling air conditioner - after the IR device is included, first need to look for the model of the air conditioner on the supported list. If not in the list, will need to do the key learning for each key on the remote controller of your air conditioner. Just follow the steps to finish all the key learning process. With the IR controller, it could power on/off, set the temperature, set the mode (cool, fan …), set the wind speed. This could also be set in the THEN of the scene. But need to be noted that the power on and off of the air conditioner is the same signal, so, the power on or off of the scene could not be correct, depends on the status of the air conditioner.
b. IR for controlling A/V controller – it’s like the controlling of air conditioner. There is also a model list of all the supported A/V television and player. If not supported, need to do the key learning of each keys on the remote controller. Each device could support up to 6 players. It means that on hotkey or scene, the device could turn on/off u to 6 players. But as the same as the control of air conditioner, the power on/off is dependent on the power status of the player because it is the same signal for on and off.
Because of the limitation that the on and off signals of the IR controller are the same, it’s hard to know the current on/off status of the machine when doing remote control through the App. The camera gateway is a good solution to this problem because the user could easily check the true status of the air conditioner or the player through the live camera video.
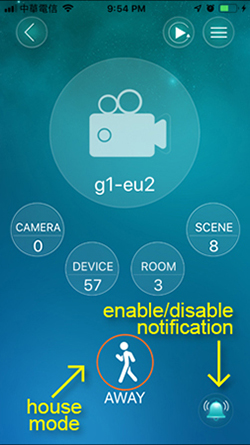
There are three house modes, home, sleep and away. Click on the house mode of the App to easily change the house mode of the gateway.
When the house mode is used in the scene settings it is helping a lot with the daily life. For example, you want to turn on all the light and TV and air conditioner when you arrived home, you could put all these actions into a scene and put the home mode to the “WHEN” condition. So, when you arrived home, just click it to home mode will activate everything. You could name a hotkey as “I’m home” and put the “home mode” into that hotkey. Then say to Alexa or Google home to switch to “home mode”. The house mode could also work with thermostat schedule to easily schedule the thermostat settings in all the rooms in your house.
When the house mode is changed, the App will receive an alarm(push) notification on your mobile.

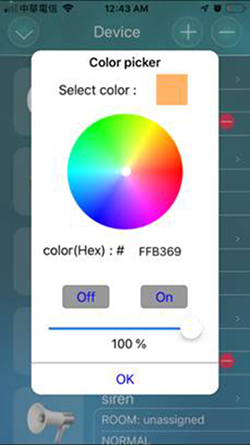
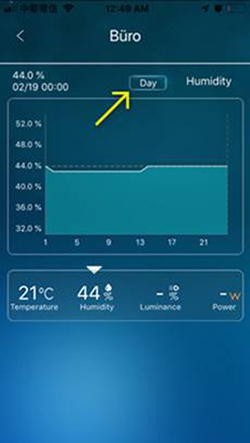
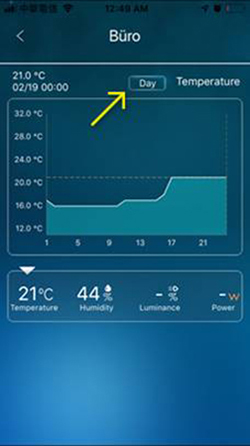
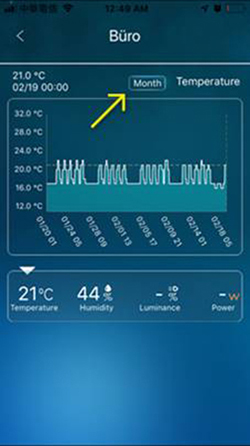
The room settings is to manage the Z-Wave devices in different rooms in your house. Each room will have their separate Z-Wave devices, and you could have the history statistics of temperatures, humidity, brightness and power consumptions for each room if there are the sensor devices in that room. The power consumption is the total power of all the Z-Wave devices in that room that can provide the power consumption information. The display of the statistics could be the last day or the last 30 days. You could turn on/off all the switch devices in a room or a group by a simple click. And could set all the bulb devices in a room or a group to the same color by a click on the color chart.
You could put all the switches in the house into a group, turn all of them on/off by a click. The room temperature, humidity, brightness and power consumption could be set as the IF condition of a scene. You could set a room or group to on/off or set the color of the bulbs for a scene ACTION. The group of devices are giving more capabilities by adding them into the hotkey or to the ACTION of the scene.
Each Z-Wave device will belong to one room, but could belong to multiple groups. It means that any one device could only be in a single room, must not be in two different rooms at the same time. But there is no such limitation for the groups, any device could be in any multiple different groups.
The maximum number of allowed rooms plus groups together in a single gateway is 40.
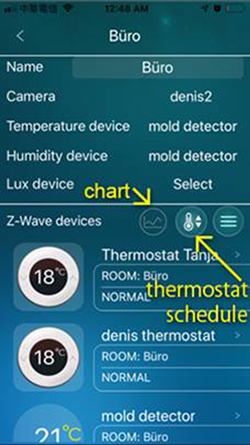

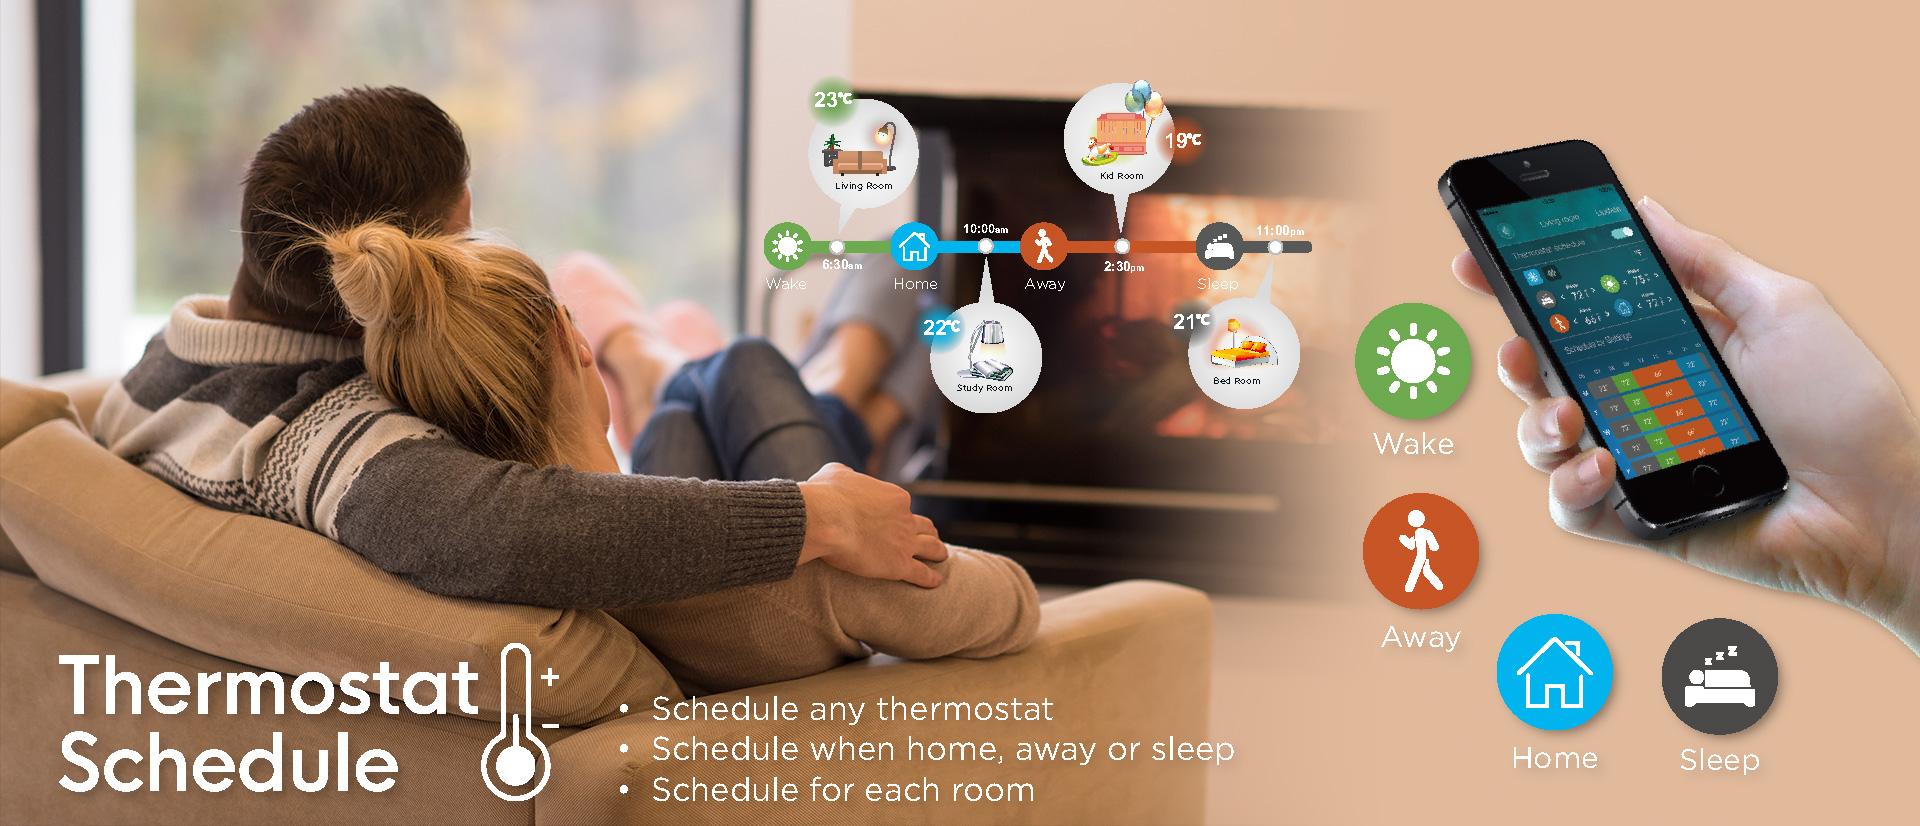
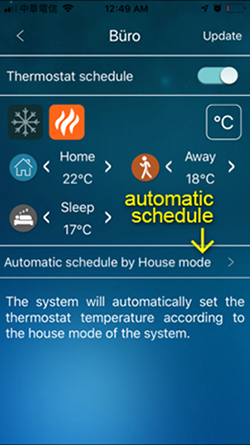
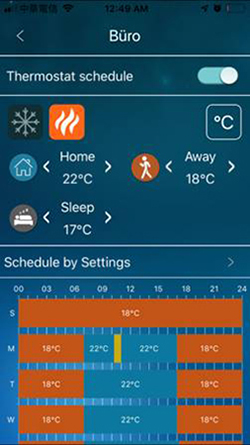
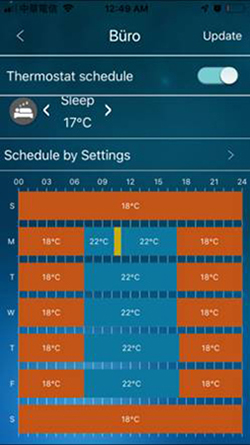
In winter time, the thermostat is used every day. The gateway makes the thermostat work as automatic as you wished. On the room settings, add the thermostat device into that room, click the thermostat schedule icon to do the scheduling.

The thermostat scheduling could be based on house mode or on weekdays mode.
On house mode scheduling, set the temperatures for home, sleep and away mode individually. Then the thermostat will heat your room when you are home or sleep and stop heating when you are away automatically.
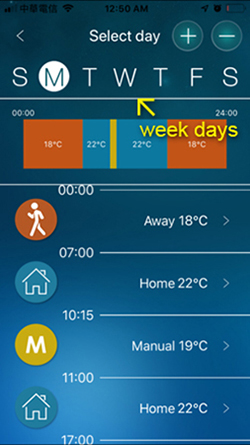
On weekdays mode scheduling, just set the temperatures for different periods in different weekdays. You can first set the Monday schedule and then copy that to other weekdays, do final tuning for each weekday. To stop heating for some period, just set the lowest temperature on that period. The thermostat schedule will work for all the thermostats in a room.
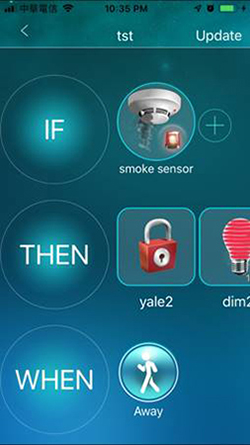
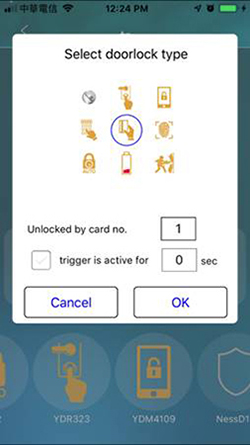
The three parts of a scene are IF, THEN and WHEN. Something happened in the Z-Wave devices or rooms or the gateways or the house mode could be set in the IF conditions.
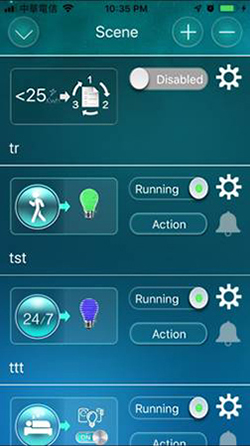
For each condition could set the “trigger is active for” duration, means that this condition is triggered if it is active for a specified duration. These conditions could be logically ORed or ANDed together. When ORed, means that any of the conditions happened will trigger the scene. When ANDed, means that all of the conditions must be happened at the same time to trigger the scene. The maximum number of allowed conditions are 6 in a scene.
When the scene is triggered, it will also check if it is inside the WHEN period. It could be always or during a fixed period of time, a fixed period for each day or some weekdays, or one of the house modes. When the IF is triggered during the WHEN period, all the actions in THEN will be executed.
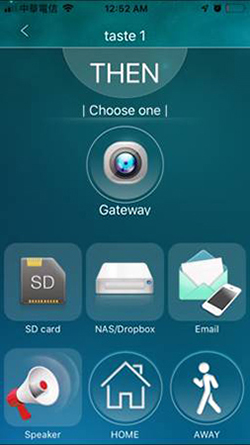
The actions could be device actions, room actions, group actions or gateway actions or a sequencer. The gateway action could be a change of the house mode. For the camera gateway. the action could be a preset position of the pan/tilt camera.

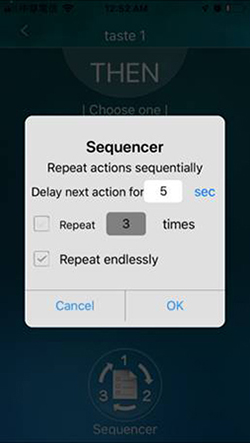
The sequencer is allowing for a repeated actions of all the items in the THEN sequentially. The delay time of each action and repeated times could be set for each sequencer. Up to 12 actions could be included in a scene. To set the scene as a timer, leave the IF field empty, set the time in the WHEN field, put all the desired actions in the THEN field, it will work.
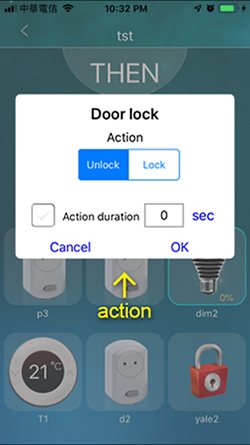
There is an “active duration” setting for each action in the THEN, if this is set, the action will stop after that duration, i.e. the switches will go back to off after on for that duration. Each scene could be disabled. You could also test the THEN actions by clicking the “action” button. The hotkey is allowing for the immediate actions of the devices, rooms, groups and gateway actions. Up to 12 actions are allowed for each hotkey. You can choose the icon color for each hotkey for easier management.
The maximum number of allowed scenes plus hotkeys together in a single gateway is 60.
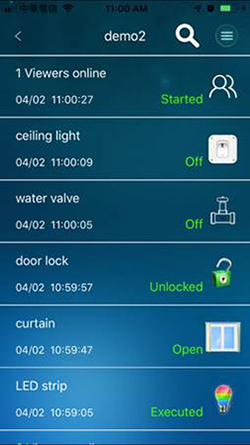
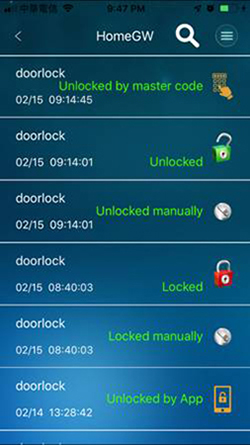
The event history of all the device triggered events, scene triggered events, house mode changed events and SD/NAS/Cloud recording events (for camera gateway only) could be displayed easily on the App. You could also search for specific key word and list all events with that key word by clicking the search icon.
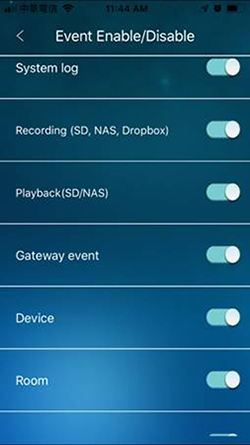
There is an “event enable/disable” settings that will allow users to disable some unnecessary evets from the system log and display. After the enable/disable is modified, the gateway will not do the log of the disabled events, but the old events were still kept in the gateway. The maximum number of events for the gateway is 1000 events. The oldest events will be cyclically replaced by new events when the maximum number of events are reached.
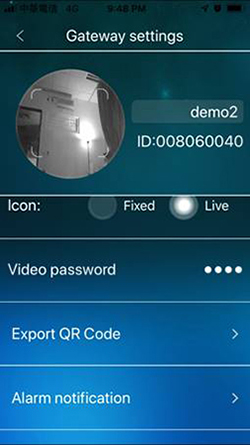
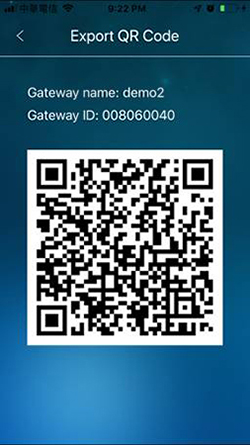
The gateway administration account and the video password of the camera gateway could be exported in a QR Code. Just a click on the “QR code export” on the settings page did the job. When the user logged in the App with a different user account, this user account also could be exported as a QR code.
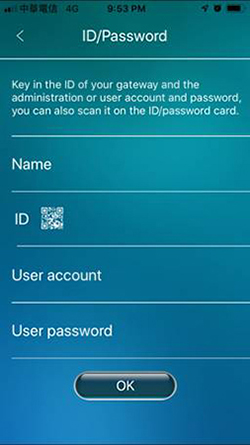
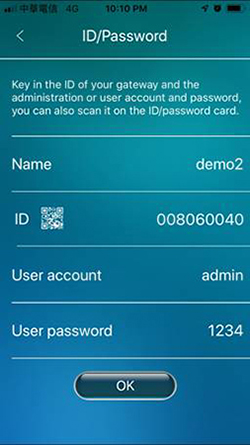
This QR code could be sent to your family members to add the gateway or could be saved as a backup for your usage in the future or could send to a technical service person to do a live check of your gateway if there is some trouble happened. To read the QR code, click the ‘+’ icon on the gateway listing page, click the manual setup, click the QR code icon and scan the QR Code and it’s done. This QR code export is allowed for administration account and other user account.
There are many different alarm notifications you could set on the gateway so that you could receive the notifications on your mobiles when different situations happened.
On each Z-Wave device, the notification could be triggered on the following conditions:
A Sensors - when it is trigged, like the PIR sensor, flood, smoke, contact sensor. Or when it exceeds a specific range of values, like temperature, humidity, brightness or even wind speed sensor.
B Battery devices - could be triggered when battery is lower than a specific percentage.
C Switches, power plug, color bulb or curtain - could be triggered when on/open or off/close, or when adjusted to a specific range if the multilevel function is provided for the device.
D Door lock - could be triggered when it’s locked or unlocked.
On each scene, you could enable the notification when it is triggered.
Just click the “bell” icon of the following pages will enable the alarm notification.
For the house mode, the notification is always enabled when the house mode is changed. And could not be disabled unless you disable all the app’s alarm notification from the mobile’s system settings. Each gateway could be disabled all the notifications.
The notifications could also be triggered to send to other apps, for example, send notification to the line, WhatsApp, Facebook, WeChat or messenger when a scene in the gateway is triggered.
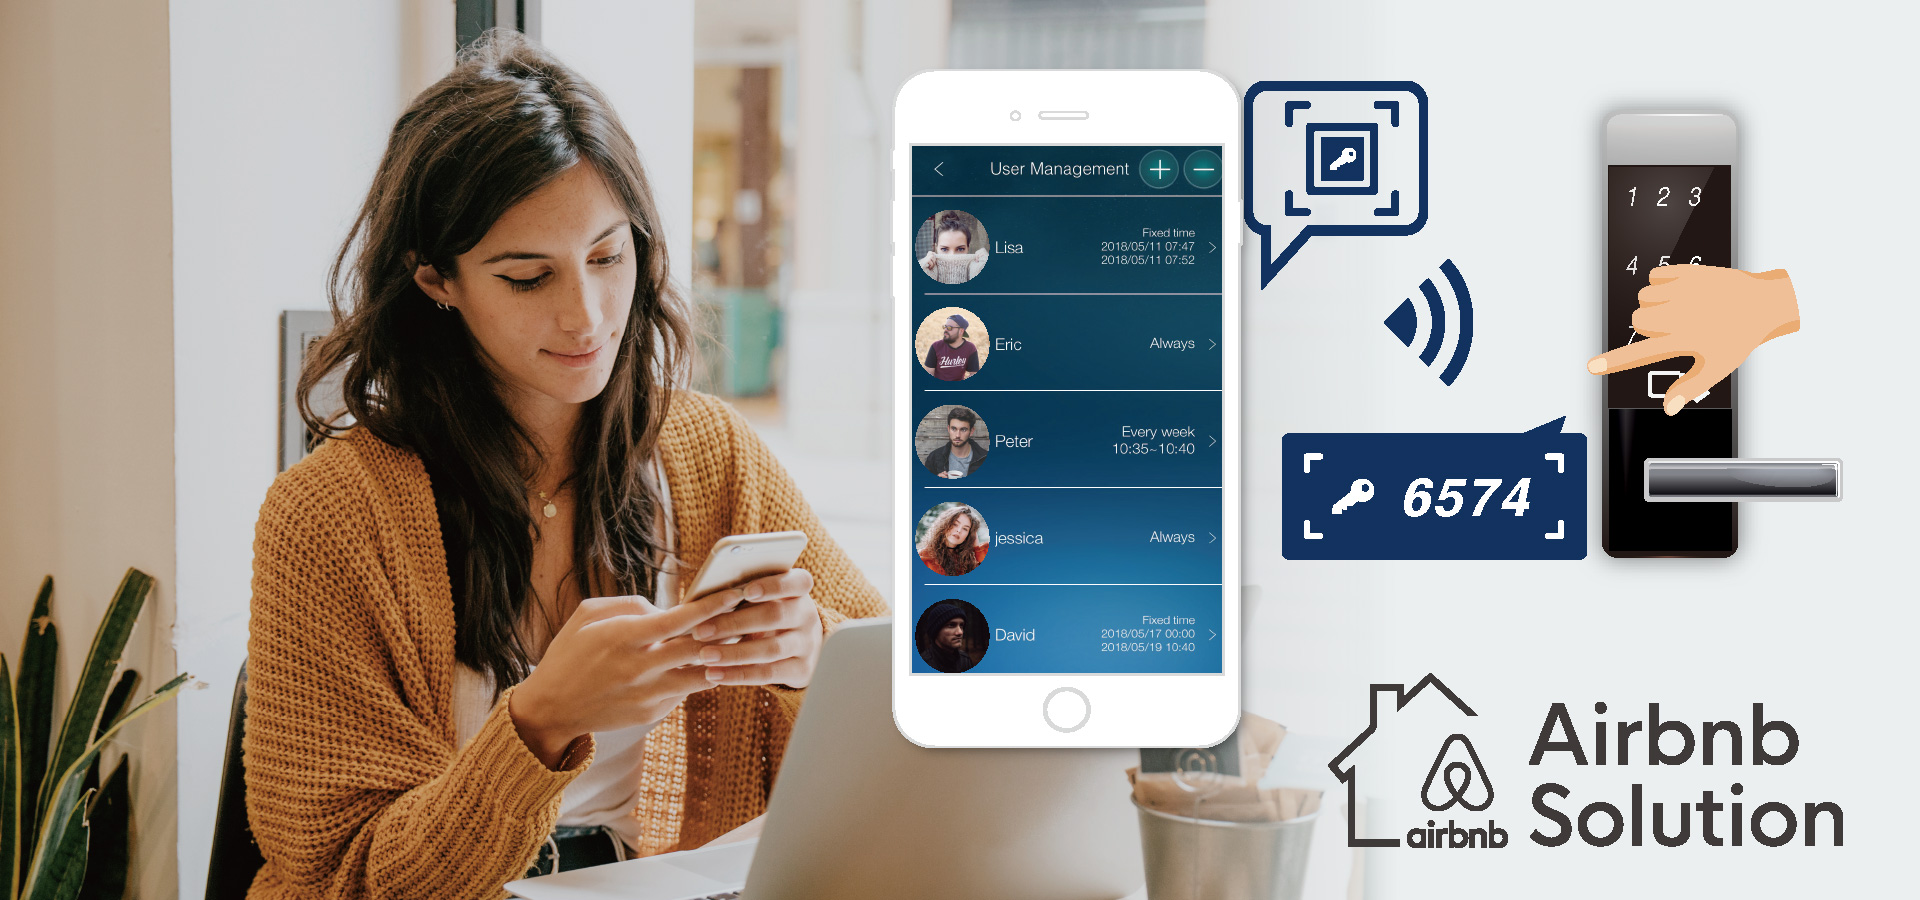
There are three major functions provided by the gateway to work for the Airbnb solution:
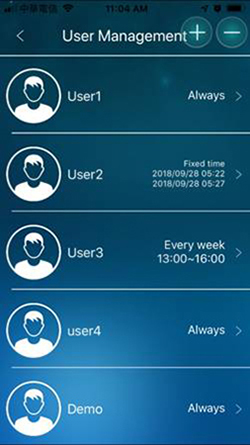
A. The user management
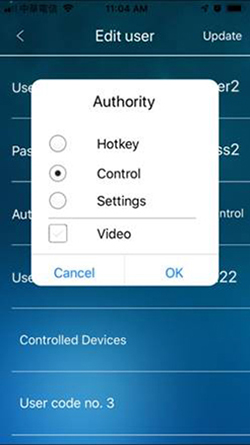
The user management function is provided for the gateway so that you can create different users with different authorities, the hotkey authority will allow user to be able to do the hotkey function only, the control authority will allow user to be able to control everything but not allowed to do any modifications, the settings authority will allow user to do everything and any modifications except the user management.
The video authority could also be allowed to only some users that could see the video of the camera gateway. Each user could be allowed to have a unique user code for the “lock/unlock” function of some specific door locks during some specific time periods. The user code no. is displayed on each user’s settings page. When the user with hotkey authority logged in, he will only see the hokey screen, and not allowed to change the hotkey settings, this makes the house owner comfortable by giving only limited control of the Z-Wave devices in his house to his guest.
B. The user codes display on the door lock
Each Z-Wave door lock will have the “Display the user codes” settings if that door lock supports the user code commands, all the user codes enabled for the door lock will be displayed, including those defined on the user management function and those added manually through the door lock keypads. Please use the user management to manage all the user codes.
The settings page of the door lock will display the operation detail of the door lock, like unlocked by finger print or user code or by app.

C. The event history of the users of the door lock
The event history will log the operations of the door lock, for example the door lock was unlocked by which user at which time, or unlocked by which finger print no. or manually locked at which time. With this event history, you could know exactly who is operating with the door lock, this is truly useful if you are an Airbnb house owner, and very convenient for your management of your house.
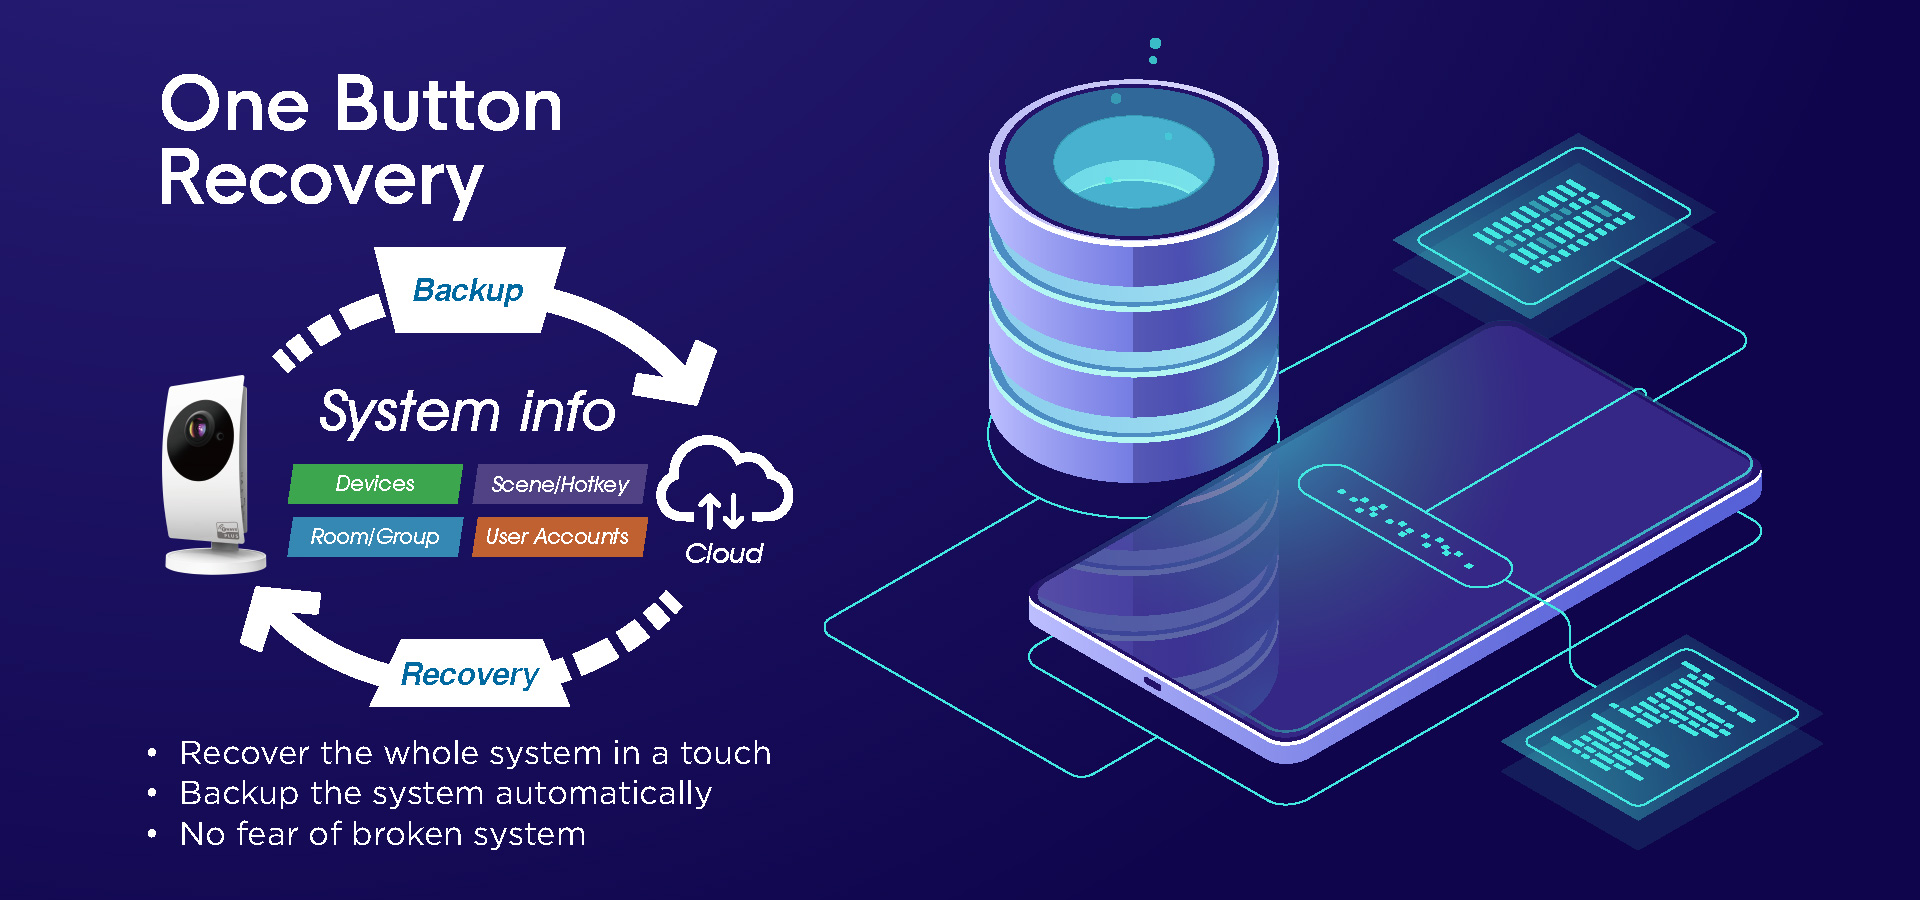
All the Z-Wave device, room, group, hotkey, scene and user management settings on the gateway could be backed up. This is useful when you installed all the necessary Z-Wave devices and finished all the settings, then In a later time, maybe your kids changed or deleted something or even accidentally broken the gateway, you may need to buy a new one, you could then easily restore everything by a simple click.
To do the backup, just go to the settings page on the App, under admin settings, click “gateway backup”, the gateway will then backup everything related to Z-Wave on the cloud.
To do the restore of all the Z-Wave settings, go to the settings page on the App, under admin settings, click “gateway restore”, key in the gateway ID and the administration account of the gateway (the one that had backed up the settings), then everything will come back.
The backup/restore function could be done between gateways and camera gateways. It means that the backed up settings of a gateway could be restored on a camera gateway, or vice versa. The backup/restore function is allowed only for administration account of the gateway.
The gateway G1 have passed the S2 certification, the benefits of S2 is the followings
A The security between the gateway and the Z-Wave devices is protected by the state of the art S2 security technology. The previous S0 is very easy to be hacked during the inclusion process. If any one of the S0 device is hacked, all the included S0 devices are hacked (but not the S2 devices). That security problem is fully protected in S2 technology.
B The response time of S2 is faster than the old S0 devices because of the improved algorithm. In previous S0 algorithm, there are a lot of nonce exchange for every commands, this is improved with less messages transferred for the Z-Wave commands. Both the single cast and multicast control of the Z-Wave devices for S2 devices are faster now. Especially if you want to control multiple S2 devices, it is much faster than controlling multiple S0 devices.
C The gateway is compatible with all the S2 and old S0 Z-Wave devices. The S2 devices will still have the best security level independent of the S0 devices included.
To include a S2 Z-Wave device, go to device settings page, click ‘+’ , click the device from the list of Z-Wave devices or “other Z-Wave device”, click “S2 device” from the pop up message and then key in the 5-digit S2 DSK (Device Specific Key) or scan the DSK QR Code, you could find it on the S2 device you want to add, then follow the instructions to finish the inclusion.
For the security sensitive devices, like door lock and the intrusion sensors (PIR and contact sensors), recommend to use the S2 Z-Wave devices.
There is a Z-Wave reset function on the settings page. Do not do the reset. The Z-Wave reset will delete all the Z-Wave devices and all the room/group/scene settings. This reset should be done only when you received the gateway at the first time and there is something left in the settings. The Z-Wave reset will clear everything related to Z-Wave.
The gateway extension allows the gateway to extend the control to all the Z-Wave devices included in another gateway at the same local area network. All the room, group, hotkey and scene functions will work on the extended Z-Wave devices. All the Amazon and Google home will also work on the extended Z-Wave devices.
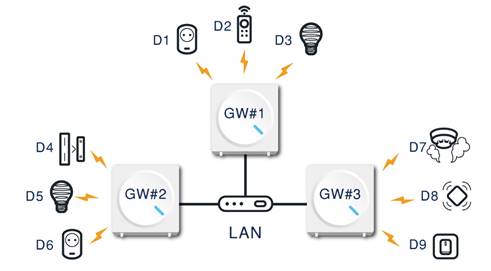
Fig 1. After gateway extension, GW#1 is able to control D1~D9
This is useful for big house especially for many-floor house. You could install one gateway in each floor and use the gateway in first floor as the major gateway. The major gateway will extend control to the other gateways and control all the Z-Wave devices in the whole house.
The benefits of this gateway extension
A Avoid bad Z-Wave signal that will be blocked by floor and walls.
B Avoid the slow response caused by complicated meshed Z-Wave network. The extended control is through Ethernet, that’s much faster.
C Each gateway could have their separate scene settings and the major gateway could have scene settings for all the Z-Wave devices. This will give the most flexibility when needed.
To extend the gateway, go to the device page, click ‘+’ , choose “Z-Wave gateway extension“, a list of the local gateways will appear, just choose one and key in the administration account of that gateway, that’s all.
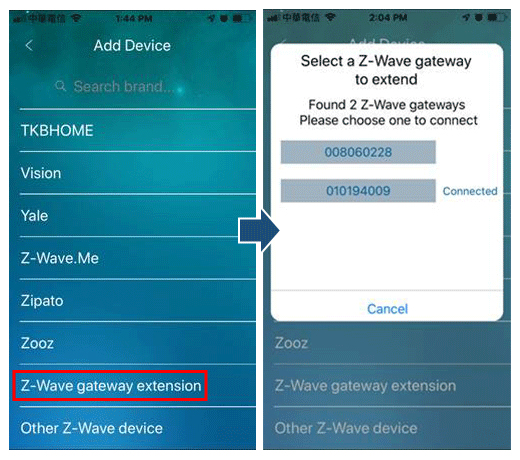
Fig 2. The procedures to enable gateway extension on App.
To remove the extended gateway, go to the device page, click ‘-‘ , choose “Z-Wave gateway extension“, a list of the extended gateways will appear, just choose the one and it will be removed.
The major gateway can extend up to 20 gateways, but the total Z-Wave devices in a gateway is limited to 120 devices.
The extension is limited to one level, it means that if gateway A extend the Z-Wave devices from gateway B, these extended Z-Wave devices could not be extended to gateway C.
To know if a Z-Wave device is extended, go to the device settings page, check a line “Added from gateway ID=xxxxxx“ for this.
One thing about the performance improvement of the Z-Wave system, always remove those inactive devices. When there is inactive devices, the inclusion process will be delayed because the Z-Wave protocol need to collect some information from all devices and got no response from the inactive devices. The control of the Z-Wave devices will also be seriously affected by the inactive devices, especially when controlling the group of devices. One inactive device will delay the whole system response.
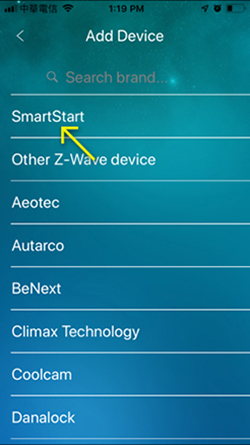
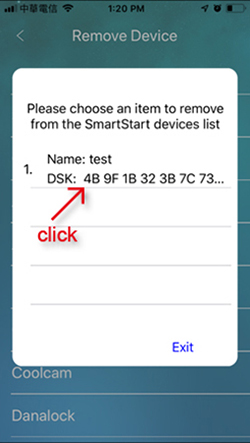
The SmartStart is a new convenient way of adding Z-Wave devices into the gateway. The Z-Wave devices that having the SmartStart feature could be added into the SmartStart list before device installation, for example before delivery to the users, so that when the users received the gateway and devices, the devices will be automatically paired with the gateway when the devices are powered on.
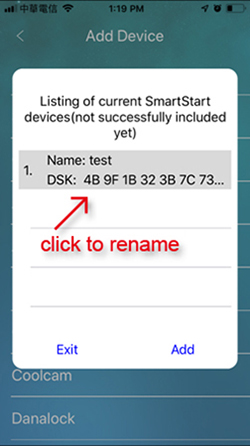
To do the SmartStart, please go to the “device” page on the App, click the “+” and click the “SmartStart”, the listing of current “SmartStart” devices will be displayed, this listing is the devices that have been added into the SmartStart listing, but not yet paired with the gateway, when any device is paired with the gateway, it will be removed from the SmartStart listing and be listed in the “device” listing.
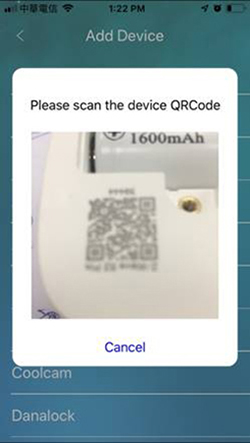
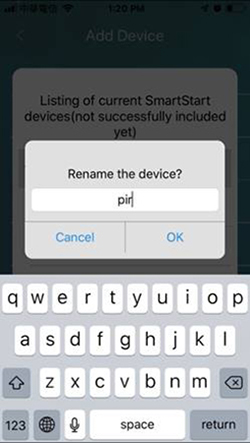
Click the “Add” button to scan the DSK of the SmartStart device and name it, this device will then be added into the SmartStart listing. Click an item on the SmartStart listing will be able to rename the device.
To remove a device from the SmartStart listing, please go to the “device” page on the App, click the “-” and click the “SmartStart”, the listing of current “SmartStart” devices will be displayed, click the item on the listing to remove it.
The SmartStart listing is stored in the gateway, whenever the SmartStart device is powered on and start the SmartStart inclusion, the gateway will automatically paired with the device and remove it from the SmartStart listing. During the pairing process, the gateway will generate some indication sounds to indicate the ongoing of the SmartStart inclusion process. The sounds are just like those for normal device inclusion.
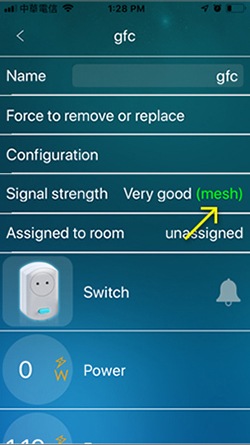
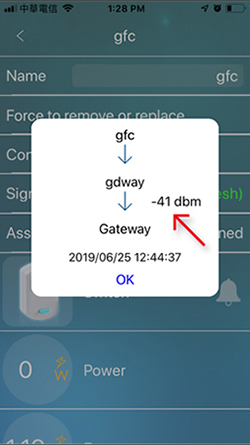
The Z-Wave signal strength and the mesh network of the Z-Wave devices could be easily displayed in the gateway. Please go to the “device” page, click the settings of any device, there will be a “Signal strength” item, and displayed as “Very good”, “Good”, “OK” or “Bad”, click it will display the mesh network of the device by indicating that this device is through which devices to the gateway and indicating the signal level with the dbm value, the value is always “minus” value, bigger number means smaller signal strength. The last time the signal was received from the device to the gateway is also displayed. By this information, users could manage the whole Z-Wave network better by adjusting some positions of the devices or adding some Z-Wave extenders or use the “Gateway Extension” in section 13 to improve the whole Z-Wave network.
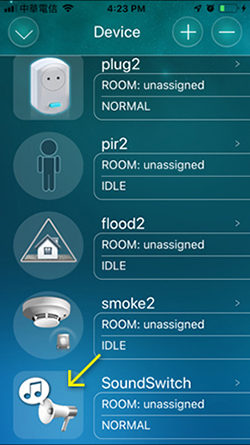
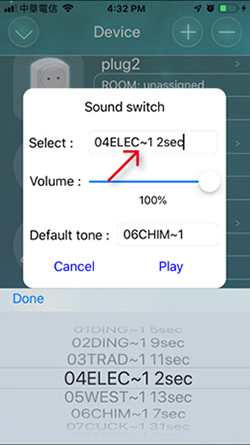
The gateway could work with Z-Wave Sound Switch devices that support COMMAND_CLASS_SOUND_SWITCH commands. After device is added to the gateway, click the device will show the GUI for playing the Sound Switch, you can choose any one of the sounds provided by the device, usually 20 or 30 sounds, you can change the volume of the sounds, and set the default tone of the device, which is usually the sound for normal usage played by other remote controller.
The Sound Switch could also be set in the “THEN” action of a “scene” settings, so that you could choose to play different sounds with different volume for different situations.
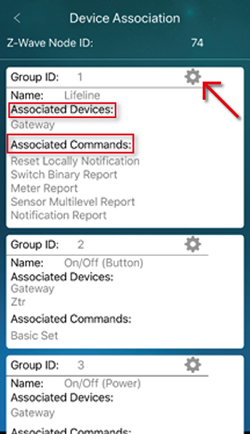
The gateway is able to configure the Z-Wave device to control other Z-Wave devices directly without the scene settings. The benefit of this is that the device to device control is fast and is good for simple control. There is a limit on the configuration of the device to device association, the devices must be the same security level, it means that the S2 device only can be associated to other S2 devices, and the S0 device only can be associated to other S0 devices.
To do the device to device association, first click the “Device Association” in the device’s settings page. The “Device Association” page will popup. It will show how many association groups exist for this device, and for each group shows the “Associated Devices” and “Associated Commands”. This means that when this device is triggered (a button pressed or sensor detected), one of the “Associated Commands” will be sent to all the “Associated Devices”. So, in order to make this device to device control works, you need to make sure the “Associated Devices” will react to the “Associated Commands” as expected by checking the device’s user manual.
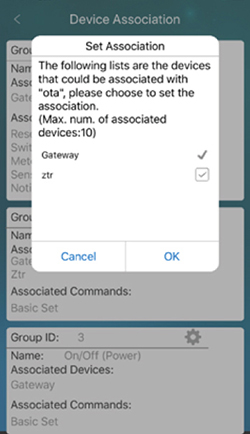
To add some device to the “Associated Devices” for a specific group, click the “*” icon, the “Set Association” page will popup that shows all the allowed devices (with the same security level) and the maximum number of devices allowed for this group. Just click the check box to add or remove some devices from this group.
After the device to device association is set, the device to device control will happen even when the gateway is powered off.
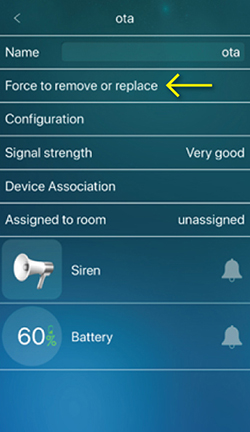
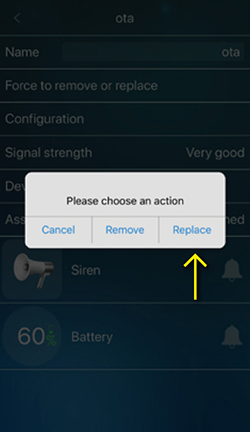
If a Z-Wave device is broken and is not responding to the gateway, you can replace it with another same Z-Wave device. Please click “Force to remove or replace” in the device’s settings page, and then choose “replace” in the popup page, the gateway will check first if the device is inactive and not responding, and then generate a “beep” sound to indicate to the user to go on next step.
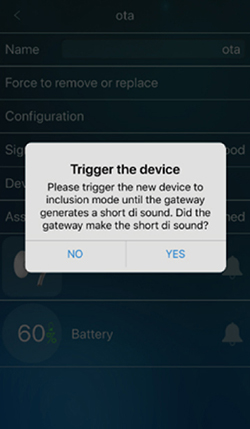
After the user confirmed to hear the “beep” sound by clicking the “Yes” button, the user will need to trigger the new Z-Wave device into inclusion mode, when the gateway is successfully starting the inclusion process, it will generate another “Di” sound, and then the whole replacing procedures will be processed between gateway and the new device. When the whole process is finished, a final “success” sound will be generated by the gateway.
When the replacement is finished, all the room/group/scene/hotkey settings set for the old device will be applied to the new device.

Some Z-Wave devices are having multiple functions in a single device, this kind of devices may use the Z-Wave Multi-Channel commands to let gateway control the individual channel/function.
There are basically two types of Multi-Channel devices, one type is that all the Multi-Channel functions are the same, for example the Multi-Channel switch or plug.
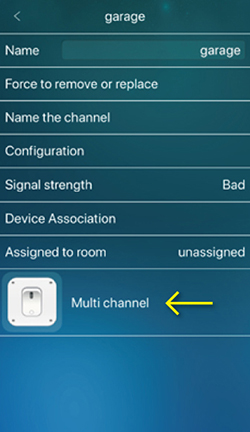
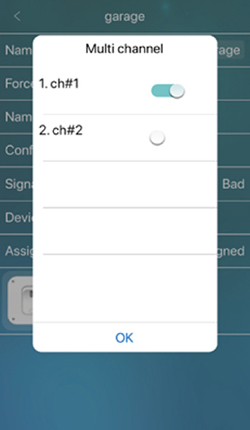
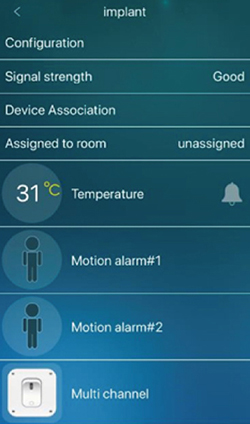
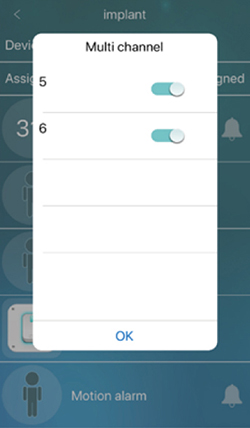
The other type is that the Multi-Channel functions are different, for example, some of the Multi-Channels are with sensor functions and the other Multi-Channels are with switch/relay functions. Some device like FIBARO Implant device is like this kind of device.
All these kind of Multi-Channel devices could be individually controlled by the gateway for each channel/function, and could also be set in the scene to be triggered for each individual channel/function or to make each individual channel/function to action according to the scene rules.
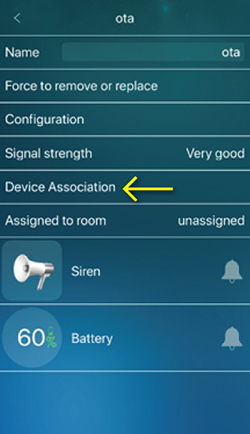
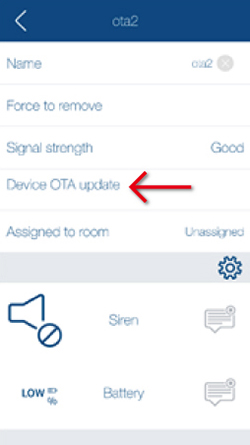
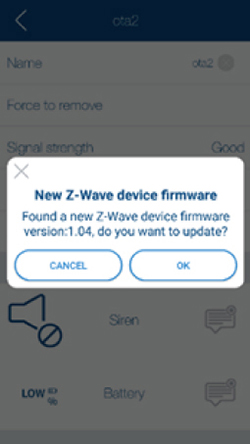
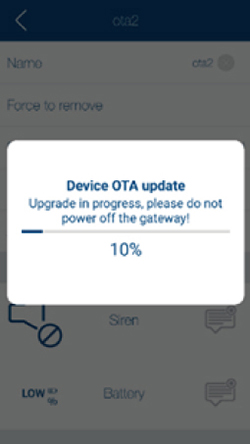
Some of the Z-Wave device could be upgraded through the gateway, this kind of device firmware upgrade is called OTA(On The Air).
To allow for this kind of OTA upgrade, first the Z-Wave device must support the OTA function, and second the latest firmware must be provided for the system to do the OTA by the gateway. When these two conditions are meet, the gateway will notify the App to indicate to the user that the device support the OTA function by displaying the “Device OTA Update” selection on the device settings page.
After the above condition is meet, to start the OTA upgrade is very simple, just click the “Device OTA upgrade” selection, the gateway will check if there is new device firmware, if yes, it will start the device firmware upgrade automatically and display the upgrade status. The upgrade process could take 5 to 10 minutes depends on the size of the device firmware.
For some system integrators or those with their own platform will need some kind of API to integrate the gateway into their system. The API should be easy to use and independent of the software platform and could integrate all the gateway functions. This kind of API is implemented and have been used by some of the customers, please contact the sales for more detailed information.
Most of the air conditioners and T/V sets and A/V players are controlled by IR remote controllers. The gateway is able to control these kind of A/C and A/V devices through the “WiFi IR controller”. The “WiFi IR controller” is connected to the WiFi router and controlled by the gateway through the Ethernet network.
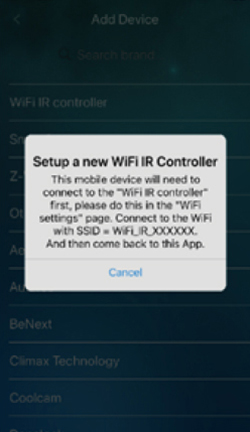
To add the “WiFi IR controller”, click the “+” icon on the “DEVICE” page, the gateway will search in the local network for the possible “WiFi IR controller” connected to the router. To setup a new “WiFi IR controller”, please click the “Setup a new WiFi IR controller” button.

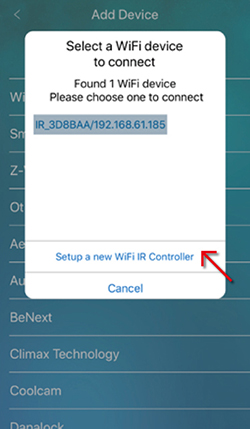
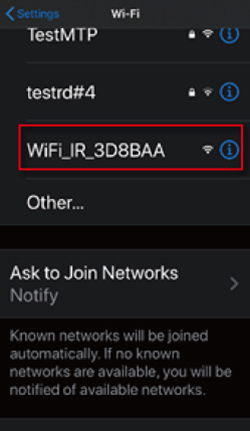
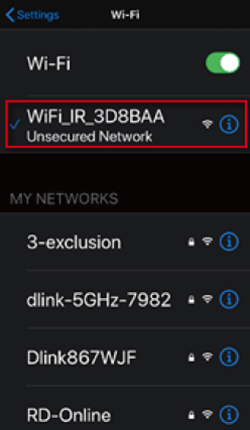
The “WiFi IR controller” is default set to the AP mode with SSID=WiFi_IR_XXXXXX, to setup the “WiFi IR controller”, the mobile device will need to connect to the “WiFi IR controller” by going to the WiFi setup page, and come back to the mCamView Z+ app after connected.
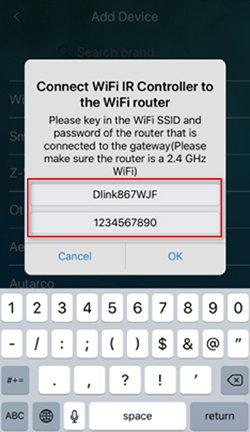
The App will pop up a page for setting the router’s SSID and password, this is the router the gateway is connected to. After input the correct information, the “WiFi IR controller” will try to connect to the router.
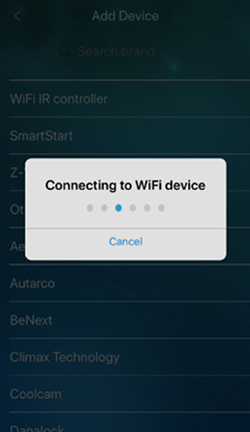
After the “WiFi IR controller” is connected to the router and the gateway is connected to the “WiFi IR controller”, the icon of the “WiFi IR controller” will be added to the device list to indicate the success of the setup of the “WiFi IR controller”.
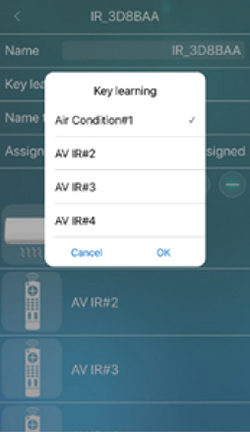
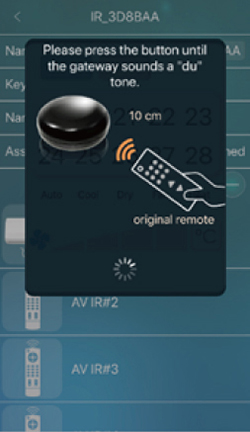
The first thing to use the “WiFi IR controller” is to do the key learning of the A/C and A/V device you have. Please click the “key learning” button to choose to learn the A/C or A/V device.
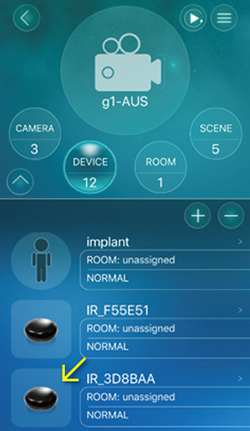
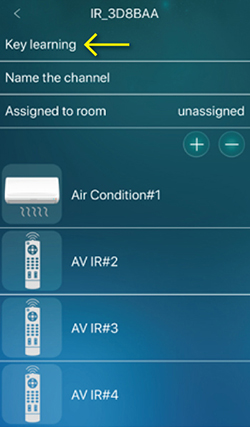
The key learning is very simple, for example, for A/C device, just click the key button on the learning page one by one, and then a operation instruction page will pop up, and then press the corresponding button on the original remote controller, when the “WiFi IR controller” learned the key, the gateway will generate a “Du” tone to indicate the learning is successful. Follow the same steps for all the key buttons on the remote controller. It’s the same for the key learning of the A/V device. A single “WiFi IR controller” can control up to 4 A/C + A/V devices. You can click the “-” and “+” icon on the settings page of this device to remove or add extra A/C or A/V device to control.
After the key learning is finished, you can now control the A/C or A/V devices directly by clicking the key button on the control panel of each device. You could also add the control into the scene/hotkey and room/group settings to allow for more complicated controls.

The most troubled problem with the Z-Wave devices is that every country need to use different frequency for each device and this need to use different Z-Wave chip/module in each device, this caused a big stock and material management problem for manufacturers and the global market brand company and generate additional cost.
The 700 series gateway solved the problem by allowing software configuration of the frequency, thus only one hardware for all different countries.
Another big improvement of the 700 series gateway is the signal range/distance between gateway and Z-Wave devices, it is largely extended. Especially for Asian frequency like Japanese and Australian and Indian frequency, the range/distance could be triple times improved. According to true testing, the open site and indoor environment all got the good improvement result. And the improvement is that only when the gateway is changed to 700 series chip/module, even if the Z-Wave devices are still using the old 300 or 500 series, the improvement in range/distance is still meet the good expectation.
The 700 series gateway is ready for testing now.
In summary, the benefits of the 700 series gateway:
. One hardware for all countries
. Much improvement of the signal range/distance
1.Setup the Google Home first
1. Download the “Google Home” app.
2. Setup the Google Home, you can also check the guide here: https://goo.gl/Mx4gtW
2.Connect the Z-Wave gateway to the Google Home
1. Make sure the Z-Wave gateway is connected to the Internet.
2. Open the “Google Home” app, tap “Menu” and then “Home control”.
3. Tap the “+” icon at the lower right corner.
4. Choose the service “mCamView”.
5. Enter the “Gateway ID”, “Admin account” and “Admin password”, then tap “SIGN IN”
3.How to voice control the Z-Wave devices
3.1. Control lights
Say "Ok Google" or “Hey Google," then...
A."Turn on <light name>"
B."Dim the <light name>"
C."Brighten the <light name>"
D."Set <light name> to 50%"
E.Dim/Brighten <light name> by 50%"
F."Turn <light name> green"
G.“Turn on/off lights in <room name>"
H.“Turn on/off all of the lights”
3.2. Control thermostats
Say "Ok Google" or “Hey Google," then...
A.To adjust the temperature: “Make it warmer/cooler,” “Raise/lower the temp,” “Raise/lower temp 2 degrees,”
"Set the temperature to 72"
B.To switch heating or cooling modes: “Turn on the heat/cooling,” “Set the thermostat to cooling/heating,"
“Turn thermostat to heat-cool mode”
C.To set the mode and temperature:“Set the heat to 68”,“Set the air conditioning to 70”
D.Turn thermostat Off: “Turn off thermostat.”
E.To set thermostat using the thermostat's room name: “Set the <Living Room> thermostat to 70.”
F.To hear the ambient temperature on the thermostat: “What’s the temperature inside?”
G.To hear what the temperature is set to on the thermostat: “What’s the thermostat set to?”
3.3. Control switches or plugs
Say "Ok Google" or “Hey Google," then...
A.“Turn on/off the [plug name]"
B.“Turn on/off the [switch name]”
3.4. Control scenes
A."Activate [scene name]"
B.“Turn on [scene name]"
3.5. Notice
A.If the gateway’s admin username or password is changed, please unlink and then link the service -
mCamView again on the Google Home App.
B.If any Z-Wave device is added or renamed, please unlink and then link the service -
again on the Google Home App.
C.Cannot say “deactivate/turn off” + scene name.
D.If you want to set nicknames for devices or assign devices to a room, please check here : https://goo.gl/tp9C2u
1.Alexa Setup
2.Enable Skill
A.Go to settings
B.Click “Skills”
C.Search “CameraGW”
D.Click “Enable Skill”
3.Log in your Z-Wave Camera
A.Make sure your Z-Wave camera gateway is connected to the Internet.
B.Enter the “Camera ID”, “Admin account” and “Admin password” of your Z-Wave camera gateway.
C.Click “SIGN IN”
4.Discover Devices
There are 2 ways to discover devices:
A.Click “Discover Devices” on the Amazon Alexa App.
B.Or say: “Alexa, discover devices”
5.Instructions – Device/Scene Control
A.On/Off message
Alexa, 【turn/switch】+ 【on/off】 + 【Z-Wave device name】
B.Percent message
Alexa, 【dim/set】 + 【Z-Wave device name】 to 【0~100】 percent.
C.Temperature control message
Alexa, set +【Z-Wave device name】 to 【19~28】 degrees.
D.Will do the Action which you set in THEN of the scene.
Alexa, 【turn/switch】 on + 【Scene name】
Copyright © 2018 StarVedia Corporation